
Part 1: Headers and Footers
Week 4 — Lesson 3 | CI1000: Computer Basics for Healthcare Professionals
Learning Objectives
By the end of this lesson you will be able to:
- Insert and customize headers and footers including page numbers in a Word document.
- Insert and position images, stock photos, and text boxes within a document.
- Use Word's citation manager to insert in-text citations and generate a bibliography.
- Apply document elements to create a healthcare-appropriate professional report.
Part 1: Headers and Footers
Headers and footers are the areas at the top and bottom of every page in a Word document. They display repeating information, such as the document title, author name, date, or page numbers, so readers can orient themselves without scrolling back to the first page. In professional and academic documents, headers and footers are not optional; they are expected.
Inserting a Header or Footer
Steps to Insert a Header
- Select the Insert tab on the Ribbon.
- In the Header & Footer group, select Header.
- Choose a built-in header style from the gallery, or select Edit Header to create a custom header.
- Type your header text. The header area is highlighted, and the main document text is dimmed.
- When finished, select Close Header and Footer on the Design tab, or double-click in the main document area.

To insert a footer, follow the same steps but select Footer instead of Header. Footers are commonly used for page numbers, copyright notices, and confidentiality statements.
Adding Page Numbers
Page numbers are one of the most common header or footer elements. To add them, select Insert, then Page Number, and choose a position: top of page, bottom of page, page margins, or current position. For APA papers, page numbers go in the top-right corner.

Different First Page
Many document formats, including APA, require a different header on the first page. For example, APA 7th edition student papers may omit the running head on the title page. To enable this feature, open the header, then check Different First Page on the Header & Footer Design tab. This allows you to leave the first-page header blank or enter different content while all subsequent pages display the standard header.
Healthcare Connection: In a healthcare office, multi-page documents such as policy manuals, training guides, and patient education booklets always include headers and footers. A typical clinic policy document might have the clinic name in the header, the policy title in the footer, and page numbers in the format "Page 3 of 12." This makes it easy to confirm that all pages are present when the document is printed or photocopied.
Part 2: Inserting Images
Images make documents more engaging and easier to understand. In healthcare, images are essential for patient education materials, training guides, procedure manuals, and reports. Word provides several ways to add images and gives you full control over how they appear in your document.
Sources for Images
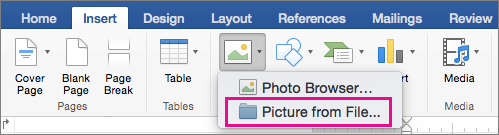
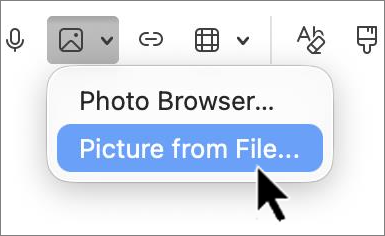
To insert an image, select the Insert tab, then select Pictures. You will see the following options:
- This Device -- Insert an image saved on your computer. Use this for screenshots, photos you have taken, or files you have downloaded.
- Stock Images -- Access Microsoft's library of royalty-free images, icons, cutout people, and stickers. These are free to use in your documents.
- Online Pictures -- Search Bing for images from the web. Be cautious about copyright; only use images labeled for reuse.
Resizing and Cropping
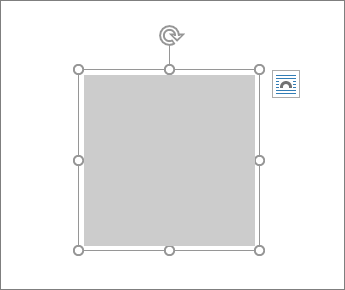
After inserting an image, you can resize it by dragging the corner handles. Always use the corner handles (not the side handles) to maintain the image's proportions. To crop an image, select it, then choose Crop from the Picture Format tab. Cropping removes unwanted portions of the image without deleting them permanently; you can reset the crop at any time.
Text Wrapping Options
By default, Word inserts images In Line with Text, which means the image behaves like a large character and pushes text below it. To position the image alongside text, you need to change the text wrapping. Select the image, then choose a wrapping style from the Layout Options button (the small icon that appears next to the image) or from the Picture Format tab.
In Line with Text -- The image sits on the same line as surrounding text and moves with it. Best for small images embedded within a paragraph, such as icons or small diagrams.
Square -- Text wraps around the image in a rectangular shape. The image can be dragged to any position on the page. This is the most commonly used wrapping option for healthcare documents because it allows text and images to coexist neatly on the same page.
Tight -- Text wraps closely around the contours of the image. Similar to Square but follows irregular shapes more closely. Useful for images with transparent backgrounds.
Behind Text -- The image sits behind the text, acting as a background element. Use cautiously; text readability can suffer if the image is not sufficiently faded or the text color does not contrast enough.
In Front of Text -- The image floats above the text, covering whatever is beneath it. Rarely used in body content but useful for decorative elements, watermarks, or overlay graphics.
Alt Text for Accessibility
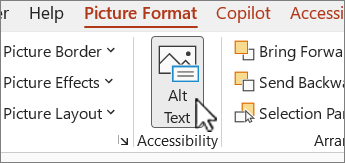
Every image in a professional document should include alt text (alternative text), a brief description that screen readers use to describe the image for visually impaired users. To add alt text, right-click the image, select Edit Alt Text, and type a concise description of what the image shows and why it is relevant. In healthcare documents, accessibility is both a professional standard and a legal requirement under the Americans with Disabilities Act (ADA).

Pro Tip: When inserting images in healthcare documents, always consider copyright and patient privacy. Never include identifiable patient photos without written consent. Microsoft's Stock Images library provides a safe, royalty-free alternative for illustrations, icons, and generic medical imagery.
Click a scenario on the left, then click its correct wrapping setting on the right.
Part 3: Text Boxes and Shapes
Text boxes and shapes allow you to place text and visual elements anywhere on a page, independent of the normal text flow. They are especially useful for creating callout boxes, sidebars, labels, and visual highlights in documents where standard paragraph formatting is not flexible enough.
Inserting a Text Box
Steps to Insert a Text Box
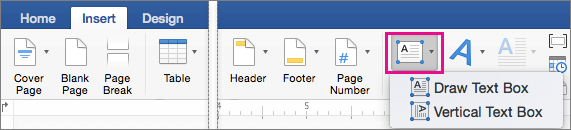
- Select the Insert tab on the Ribbon.
- Select Text Box in the Text group.
- Choose a built-in text box style from the gallery, or select Draw Text Box to create a custom-sized box.
- Click and drag on the document to draw the text box, then type your content inside it.
- Use the Shape Format tab to change the border color, fill color, and text alignment.
Formatting Text Boxes
After inserting a text box, you can customize its appearance to match your document's design. Common formatting options include the following:
- Fill color -- Change the background color. Use a light shade for readability.
- Outline -- Add, remove, or change the border color and thickness.
- Text alignment -- Align text left, center, or right within the box.
- Margins -- Adjust internal margins so text does not touch the edges.
- Shadow and effects -- Add subtle shadow or rounded corners for a polished look.
Drawing Shapes
Word includes a library of shapes (rectangles, circles, arrows, callouts, flowchart symbols) that you can insert and customize. To insert a shape, select Insert, then Shapes, and choose from the gallery. After drawing the shape, right-click it and select Add Text to type inside it.
Layering and Grouping
When you have multiple shapes or text boxes overlapping, you can control which element appears on top using Bring Forward and Send Backward on the Shape Format tab. To move multiple elements together as a single unit, select all of them (hold Ctrl and click each one), then right-click and select Group. Grouped objects can be moved, resized, and formatted as one item.
Healthcare Connection: Text boxes are widely used in patient education materials. A patient handout about managing diabetes might include a callout box with the text: "Call your provider immediately if your blood sugar drops below 70 mg/dL." The callout box draws attention to critical safety information that patients might otherwise overlook in a paragraph of text. Using a colored border and bold text inside the box makes it visually distinct.
Knowledge Check
Part 4: Citations and Bibliography
In Lesson 4.2, you learned about APA formatting and plagiarism prevention. Now you will learn how to use Microsoft Word's built-in citation manager to insert in-text citations and automatically generate a bibliography. This tool saves significant time and reduces formatting errors, especially as your reference list grows.
Setting the Citation Style
Steps to Set APA Style in Word
- Select the References tab on the Ribbon.
- In the Citations & Bibliography group, find the Style dropdown.
- Select APA from the list. (If you do not see APA, scroll through the available styles.)
Once APA is selected, all citations and the bibliography you generate will follow APA 7th edition formatting rules automatically.
Adding a Source
Steps to Add a New Source
- Place your cursor where you want the in-text citation to appear.
- On the References tab, select Insert Citation, then Add New Source.
- In the Create Source dialog box, select the source type (book, journal article, website, and so on).
- Fill in the required fields: author name, title, year, publisher or journal name, and URL or DOI if applicable.
- Select OK. Word inserts the in-text citation at your cursor position and stores the source in your document's source library.
Inserting an In-Text Citation
After you have added a source, you can reuse it anywhere in the document. Place your cursor at the desired location, select Insert Citation on the References tab, and choose the source from your saved list. Word automatically formats the citation in APA style: (Author, Year).
Generating a Bibliography
Steps to Generate a Bibliography
- Place your cursor where you want the bibliography to appear (typically on a new page at the end of your document).
- On the References tab, select Bibliography.
- Choose References (APA uses the heading "References," not "Bibliography" or "Works Cited").
- Word generates a formatted list of all sources cited in your document, sorted alphabetically with hanging indents.
If you add or edit sources after generating the bibliography, right-click the bibliography and select Update Field to refresh it with the latest information.
Pro Tip: Word's citation manager stores your sources in two locations: the Current List (sources in the active document) and the Master List (a library shared across all your Word documents). If you frequently cite the same sources across multiple papers, your Master List saves you from re-entering the same information each time.
Part 5: Putting It Together -- Healthcare Report
Now that you have learned about headers, footers, images, text boxes, and citations individually, it is time to combine these elements into a single, professional document. The following walkthrough guides you through creating a one-page healthcare fact sheet that uses every skill from this lesson.
Mini-Project: Infection Prevention Fact Sheet
Imagine you are a medical office assistant and your supervisor has asked you to create a one-page fact sheet about hand hygiene for the clinic's waiting room. The fact sheet should look professional, include a source citation, and highlight key information visually.
Step-by-Step Walkthrough
- Create a new blank document. Press Ctrl + N to open a blank document.
- Add a header. Select Insert, then Header, and choose a simple header style. Type the clinic name: "Sunrise Family Practice." On the right side, insert the page number.
- Add a footer. Select Insert, then Footer. Type "Confidential - For Patient Use Only" and center it.
- Set the title. Type "Hand Hygiene: Protecting Yourself and Others" as a Level 1 heading (centered, bold, 16-point font).
- Write the body text. Write two to three paragraphs explaining when and how to wash hands properly, citing the CDC guidelines.
- Insert an image. Select Insert, then Pictures, then Stock Images. Search for "handwashing" and insert a relevant image. Change the text wrapping to Square and position it to the right of the first paragraph. Add alt text: "Healthcare worker washing hands at a clinic sink."
- Add a callout text box. Select Insert, then Text Box, then Draw Text Box. Draw a box below the body text. Type: "Wash your hands for at least 20 seconds with soap and water." Format the box with a light blue fill and a teal border to match clinic branding.
- Insert a citation. At the end of the sentence about CDC guidelines, select References, then Insert Citation, then Add New Source. Enter the CDC source information. Word inserts (Centers for Disease Control and Prevention, 2024).
- Generate the reference list. Press Ctrl + Enter to start a new page. Select References, then Bibliography, then References. Word creates a formatted reference list.
- Review and save. Check that the header, footer, image, text box, and citation all appear correctly. Save as "HandHygiene_FactSheet_2026.docx."
Key Takeaway: Professional healthcare documents combine multiple elements working together: headers and footers for identification, images for visual communication, text boxes for emphasis, and citations for credibility. Mastering each element individually gives you the building blocks; combining them effectively is what produces polished, workplace-ready documents.
Knowledge Check
Arrange the steps for assembling a professional healthcare report in the correct order. Click two items to swap their positions, then check your answer.
Lesson 4.3 Summary
- Headers and footers display repeating information (document title, page numbers, confidentiality notices) on every page. Use "Different First Page" for APA title pages.
- Insert images from your device, Microsoft Stock Images, or online sources. Always change text wrapping from "In Line" to "Square" or another option to position images beside text.
- Add alt text to every image for accessibility compliance.
- Text boxes and shapes let you create callout boxes, sidebars, and visual highlights. Group multiple elements to move and format them as a single unit.
- Word's citation manager (References tab) stores sources, inserts APA-formatted in-text citations, and generates a bibliography automatically.
- Combining headers, images, text boxes, and citations produces professional healthcare documents such as fact sheets, reports, and patient education materials.