
Part 1 of 6 — The Word Ribbon and Home Tab
Week 2 — Lesson 3 | CI1000: Computer Basics for Healthcare Professionals
Learning Objectives
By the end of this lesson you will be able to:
- Navigate the Word Ribbon to locate formatting tools on the Home tab.
- Apply character formatting including font, size, bold, italic, underline, color, and highlighting.
- Use editing tools including Copy, Cut, Paste, Undo, and Find and Replace to modify a document efficiently.
- Identify and correct spelling and grammar errors using Word's built-in proofing tools.
Part 1 of 6 — The Word Ribbon and Home Tab
Last week you learned how to create, save, and organize Word documents. This week, you will explore the tools that transform plain text into polished, professional documents. All of these tools live on the Ribbon, the wide toolbar that stretches across the top of the Word window.
Understanding the Ribbon
The Ribbon is organized into tabs, and each tab contains groups of related tools. The tabs you will see include the following:
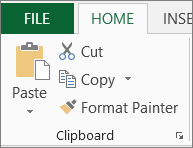
- Home — Font formatting, paragraph settings, styles, clipboard, and editing tools (your most-used tab)
- Insert — Tables, images, shapes, headers, footers, page numbers, and links
- Design — Document themes, colors, and page borders
- Layout — Margins, orientation, page size, columns, and spacing
- References — Table of contents, footnotes, citations, and bibliography
- Review — Spelling and grammar check, comments, and Track Changes
- View — Document views, zoom, and window arrangement
For this lesson, you will spend most of your time on the Home tab, which contains the four groups you will use most frequently:
Font Group
Font family, size, bold, italic, underline, strikethrough, text color, and text highlight.
Paragraph Group
Alignment, line spacing, bullets, numbering, indentation, and borders.
Styles Group
Pre-built formatting combinations for headings, titles, subtitles, and body text.
Editing Group
Find, Replace, and Select tools for locating and modifying text throughout your document.

The Quick Access Toolbar
Above the Ribbon is a small, customizable toolbar called the Quick Access Toolbar. By default, it contains Save, Undo, and Redo buttons. You can add your most-used commands here by right-clicking any Ribbon button and selecting Add to Quick Access Toolbar. This is especially helpful for commands you use dozens of times per day, such as Print or Paste.
Pro Tip: If the Ribbon feels overwhelming, remember that you do not need to learn every button at once. For this week, focus on the Font group and the Editing group on the Home tab. You will explore the other groups in the coming weeks.
Click an item to select it, then click the correct Ribbon group to place it there.
Part 2 of 6 — Character Formatting
Character formatting changes the appearance of individual characters, words, or selected text without affecting the rest of the document. These tools are all located in the Font group on the Home tab. To apply any character formatting, you must first select the text you want to change, then apply the formatting.
Core Character Formatting Options
Font Family and Size
The font family (sometimes called "typeface") determines the style of the letters. Common professional fonts include the following:
- Calibri — Word's default font. Clean and modern, suitable for most business documents.
- Times New Roman — A traditional serif font often required for academic papers and APA formatting.
- Arial — A widely used sans-serif font that is easy to read on screens.
The font size is measured in points. Standard body text is typically 11 or 12 points. Headings are usually 14 to 18 points. To change the font or size, select your text and use the dropdown menus in the Font group, or type the size directly into the size box.
Bold, Italic, and Underline
These three formatting options are the most frequently used character formatting tools:
- Bold (Ctrl + B) — Makes text thicker and heavier. Use bold for headings, key terms, and critical instructions. In healthcare documents, bold is often used for medication names, warning labels, and section headings.
- Italic (Ctrl + I) — Slants text to the right. Use italic for titles of publications, emphasis, and defined terms being introduced for the first time.
- Underline (Ctrl + U) — Adds a line beneath the text. Use sparingly in printed documents (underlined text can be confused with hyperlinks). In healthcare, underline is sometimes used to draw attention to critical policy requirements.
You can combine these formats. For example, text can be both bold and italic when you need strong emphasis.
Text Color and Highlighting
Font Color changes the color of the text itself. The button in the Font group shows a colored bar beneath the letter "A." Click the dropdown arrow to select a different color. Use color sparingly and ensure sufficient contrast for readability.
Text Highlight adds a colored background behind selected text, similar to a highlighter pen on paper. This is useful for marking text that needs review or drawing a colleague's attention to specific sections in a shared document. Common highlight colors are yellow, green, and turquoise.
Format Painter
The Format Painter is a time-saving tool that copies formatting from one selection and applies it to another. Here is how to use it:
- Select the text that has the formatting you want to copy.
- Click the Format Painter button (the paintbrush icon in the Clipboard group on the Home tab).
- Click and drag across the text you want to format. The formatting is applied instantly.
To apply the same formatting to multiple selections, double-click the Format Painter button. It stays active until you press Esc or click the button again.
Healthcare Connection: Consistent formatting is essential in healthcare documents. A patient information sheet with mismatched fonts and random bold text looks unprofessional and can confuse patients. Medical offices typically establish formatting standards, for instance, all patient handouts use Calibri 12pt body text with bold headings. The Format Painter helps you apply these standards quickly across an entire document.
Click the card to flip it
Part 3 of 6 — Text Selection and Editing
Before you can format, move, copy, or delete text, you must first select it. Word provides several selection methods designed for different situations. Mastering these techniques makes your editing workflow significantly faster.
Selection Techniques
| Method | How to Do It | What It Selects |
|---|---|---|
| Click and drag | Hold the left mouse button and drag | Any range of text you drag across |
| Double-click | Double-click on a word | The entire word |
| Triple-click | Triple-click within a paragraph | The entire paragraph |
Ctrl + A |
Press Ctrl and A together | All text in the document |
Shift + Click |
Click at start, hold Shift, click at end | Everything between the two click points |
Ctrl + Shift + Arrow |
Hold Ctrl and Shift, press an arrow key | One word at a time in the arrow direction |
The Clipboard: Cut, Copy, and Paste
The clipboard is a temporary storage area that holds text or other content you have cut or copied. The three core clipboard operations are the following:
- Copy (Ctrl + C) — Duplicates the selected text to the clipboard. The original remains in place.
- Cut (Ctrl + X) — Removes the selected text from the document and places it on the clipboard.
- Paste (Ctrl + V) — Inserts the clipboard contents at the current insertion point.
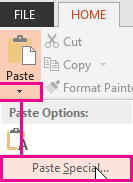
Word also offers Paste Special options. Click the small arrow below the Paste button on the Home tab to choose how pasted content is formatted. The options include the following:
- Keep Source Formatting — Preserves the original formatting of the copied text.
- Merge Formatting — Blends the copied text's formatting with the destination document.
- Keep Text Only — Strips all formatting and pastes plain text. This is especially useful when copying text from a website or EHR system, because it removes unwanted fonts, colors, and spacing.
Undo and Redo
Word allows you to reverse your recent actions with Undo (Ctrl + Z) and restore them with Redo (Ctrl + Y). You can undo up to 100 consecutive actions. Think of Undo as your safety net: if you accidentally delete a paragraph, paste the wrong text, or apply the wrong formatting, a quick Ctrl + Z brings everything back instantly.
Pro Tip: When copying information from an EHR or a website into a Word document, use Keep Text Only (or press Ctrl + Shift + V in some Word versions). This strips away unwanted formatting, giving you clean text that matches your document's design. This small habit can save significant cleanup time.
Part 4 of 6 — Find and Replace
Find and Replace is one of the most powerful editing tools in Word, and it becomes increasingly valuable as your documents grow longer. Instead of manually scanning through pages of text, you can locate and change specific words or phrases across the entire document in seconds.
Using Find (Ctrl + F)
Pressing Ctrl + F opens the Navigation pane on the left side of the Word window. Type a word or phrase in the search box, and Word instantly highlights every occurrence in the document. You can click through the results to jump to each one. This is invaluable when working with long documents, such as a 15-page clinic procedures manual where you need to find every mention of a specific policy number.
Using Find and Replace (Ctrl + H)
Pressing Ctrl + H opens the Find and Replace dialog box. This tool lets you search for a specific word or phrase and replace it with something else. You can replace occurrences one at a time (by clicking Replace) or all at once (by clicking Replace All).
Find and Replace is especially useful in healthcare documentation for tasks such as the following:
- Updating a provider's name throughout a referral letter template when a new physician joins the practice
- Correcting a misspelled medication name that appears multiple times in a patient information sheet
- Changing a date across all pages of a multi-page form
- Replacing an old department name with a new one after a reorganization

Advanced Find and Replace Options
Click More in the Find and Replace dialog to access advanced options:
- Match case — Distinguishes between uppercase and lowercase letters (for example, finding "HIPAA" but not "hipaa").
- Find whole words only — Prevents partial matches (for example, finding "form" but not "information").
- Use wildcards — Allows pattern-based searching for advanced users.
Knowledge Check
Part 5 of 6 — Spelling and Grammar Tools
Word continuously checks your spelling and grammar as you type. When Word detects a potential error, it marks the text with a colored underline. Understanding these visual indicators helps you identify and correct errors quickly.
Understanding the Underline Colors
- Red wavy underline — Word does not recognize the word. This usually indicates a spelling error, but it can also appear under proper nouns, medical terminology, or abbreviations that are not in Word's dictionary.
- Blue wavy underline — Word has detected a grammar issue, such as subject-verb disagreement, incorrect punctuation, or sentence fragments.
- Purple underline (Editor suggestions) — Word's Editor tool suggests style improvements, such as simplifying a complex sentence or using a more concise phrase. These are suggestions, not errors.
Correcting Errors
There are two ways to address flagged errors:
- Right-click the underlined word. A context menu appears with suggested corrections. Select the correct option to apply the fix. If the word is correct (such as a medical term), select Add to Dictionary so Word does not flag it again.
- Open the Spelling and Grammar pane. Press F7 or go to Review > Spelling & Grammar. Word walks through every flagged item in the document, presenting suggestions for each one. This is the best approach when you want to review the entire document at once before printing or submitting.
Adding Medical Terms to the Dictionary
Healthcare documents contain many specialized terms that Word does not recognize by default, such as medication names, medical abbreviations, and diagnostic codes. The first time a medical term is flagged, right-click it and select Add to Dictionary. Once added, Word will recognize the term in all future documents and stop marking it as a spelling error. Over time, your custom dictionary will grow to include the terminology specific to your workplace.
Healthcare Connection: In a medical office, a spelling error in a patient communication or referral letter can undermine the professionalism of the practice and, in some cases, cause confusion about medications or procedures. Running the spelling and grammar checker before finalizing any healthcare document is a simple quality control step that takes only a minute but can prevent embarrassing or potentially harmful mistakes.
Knowledge Check
Part 6 of 6 — Putting It All Together: Healthcare Document Formatting
Now that you know how to use character formatting, editing tools, Find and Replace, and the spelling checker, it is time to see how these skills come together in a realistic healthcare scenario.
Scenario: Formatting a Medical Office Memo
Imagine that your office manager has drafted a memo announcing updated patient check-in procedures. The memo was typed quickly and needs formatting before it can be distributed to staff. Here is how you would use the skills from this lesson to polish it:
- Apply a heading. Select the memo title and change the font to Calibri, 16pt, Bold. This makes the title stand out from the body text.
- Format key terms. Bold important terms such as the names of new procedures, deadlines, and required actions so staff can scan the memo quickly.
- Fix a repeated error. The office manager misspelled the new software name as "PatientTrax" instead of "PatientTrak" in several places. Open Find and Replace (Ctrl + H), type "PatientTrax" in the Find field and "PatientTrak" in the Replace field, then click Replace All.
- Run the spelling and grammar checker. Press F7 to review the entire document. Accept valid corrections and add any medical terms to the dictionary.
- Use the Format Painter. The first subheading is formatted correctly (bold, 13pt, dark blue). Use the Format Painter to apply the same formatting to the remaining subheadings so the memo looks consistent.
- Review and save. Read through the memo one final time, then press Ctrl + S to save.
Essential Keyboard Shortcuts for This Lesson
| Shortcut | Action | Healthcare Use Example |
|---|---|---|
Ctrl + B |
Bold | Emphasize a medication name in patient instructions |
Ctrl + I |
Italic | Italicize a publication title in a reference list |
Ctrl + U |
Underline | Underline a critical deadline in a policy memo |
Ctrl + C |
Copy | Copy a medication list to paste into another document |
Ctrl + X |
Cut | Move a paragraph to a different section of a report |
Ctrl + V |
Paste | Paste an address block into a referral letter |
Ctrl + Z |
Undo | Reverse an accidental deletion in a memo |
Ctrl + Y |
Redo | Restore text you just undid |
Ctrl + F |
Find | Search for a specific diagnosis code in a long document |
Ctrl + H |
Find and Replace | Replace an outdated provider name throughout a template |
F7 |
Spelling and Grammar | Review the entire document for errors before printing |
Ctrl + A |
Select All | Select the entire document to change the font |
Key Takeaway: Professional healthcare documents require consistent formatting, accurate spelling, and efficient editing. The skills you practiced in this lesson, from character formatting and clipboard operations to Find and Replace and the spelling checker, form the foundation you will build on throughout this course. As you complete this week's assignment, focus on using keyboard shortcuts. The more you practice them now, the faster and more confident you will become with Word.
Lesson 2.3 Summary
- The Ribbon is organized into tabs. The Home tab contains the Font, Paragraph, Styles, and Editing groups you will use most.
- Character formatting (font, size, bold, italic, underline, color, highlighting) is applied by selecting text first, then choosing the formatting option.
- The Format Painter copies formatting from one selection to another, saving time when applying consistent styles.
- Cut (Ctrl + X), Copy (Ctrl + C), and Paste (Ctrl + V) move or duplicate text using the clipboard. Use Paste as Text Only when copying from external sources.
- Find and Replace (Ctrl + H) locates and changes specific text throughout a document in seconds.
- Spelling and grammar errors are marked with colored underlines: red for spelling, blue for grammar, and purple for style suggestions.
- Add medical terms to the custom dictionary so Word stops flagging them as errors.