
Part 1: Why Keyboarding Matters in Healthcare
Week 1 — Lesson 1 | CI1000: Computer Basics for Healthcare Professionals
Learning Objectives
By the end of this lesson you will be able to:
- Explain why keyboarding proficiency is essential for healthcare data entry, medical transcription, and clinical documentation.
- Demonstrate proper typing posture including seated position, wrist alignment, elbow angle, and screen distance.
- Identify the home row keys and describe their role as the anchor position for touch typing.
- Explain how consistent daily practice builds the muscle memory required for typing proficiency.
Part 1: Why Keyboarding Matters in Healthcare
Think about the last time you visited a doctor's office. The medical assistant checked you in, updated your records, and typed notes into the computer while the provider spoke. Behind every patient visit is a steady stream of typed information: appointment notes, insurance details, medication lists, and clinical observations. In healthcare, typing is not just a computer skill. It is a professional necessity.
Healthcare workers rely on accurate, efficient keyboarding every day. Medical office assistants enter patient demographics into electronic health record (EHR) systems. Billing specialists type procedure codes and insurance claims. Clinical staff document vital signs, treatment plans, and follow-up instructions. The faster and more accurately you can type, the more time you have to focus on patients rather than the keyboard.
Speed and Accuracy in the Medical Office
Most entry-level healthcare administrative positions expect a minimum typing speed of 30 to 40 words per minute (WPM) with at least 90 percent accuracy. Medical transcriptionists and coding specialists often need 60 WPM or higher. These are not arbitrary numbers. When a provider finishes a patient visit and needs the encounter documented within minutes, every keystroke counts.
Accuracy matters just as much as speed. A single mistyped digit in a medication dosage, insurance ID number, or date of birth can lead to billing rejections, delayed treatments, or even patient safety concerns. Building strong keyboarding habits from the start helps you avoid these costly errors.
Healthcare Scenario: Imagine you are a medical office assistant at a busy family practice. A patient arrives for a same-day sick visit, and you need to register them in the EHR system quickly so the provider can see them on time. You enter the patient's full name, date of birth, insurance information, and reason for the visit. Accurate, confident typing allows you to complete this process in under two minutes, keeping the schedule on track and the patient satisfied.
Part 2: The Home Row and Touch Typing Basics
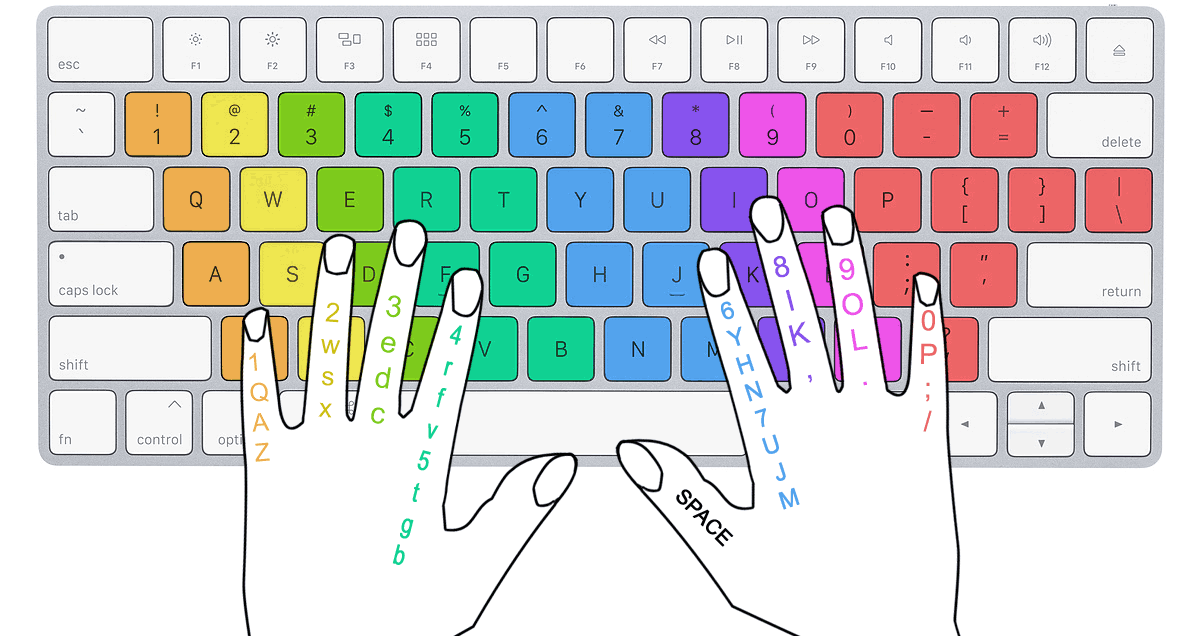
Touch typing means typing without looking at the keyboard. Instead of hunting for each letter with one or two fingers, you train all eight fingers (and both thumbs) to find keys by feel. The foundation for touch typing is the home row, the middle row of letter keys on a standard QWERTY keyboard.
The Home Row Keys
Place your fingers on the following keys to find your home position:
- Left hand: pinky on A, ring finger on S, middle finger on D, index finger on F
- Right hand: index finger on J, middle finger on K, ring finger on L, pinky on ; (semicolon)
- Both thumbs rest lightly on the Space Bar
Notice that the F and J keys have small raised ridges or bumps on them. These tactile markers allow you to find the home row position without looking down. Every time your fingers return to these keys after reaching for another letter, you are back in home position and ready for the next keystroke.

Why QWERTY?
The QWERTY keyboard layout was designed in the 1870s for mechanical typewriters. While other layouts exist (such as Dvorak), QWERTY remains the standard on virtually every computer, laptop, and tablet worldwide. All healthcare systems, EHR platforms, and office software use QWERTY keyboards, so mastering this layout is the practical choice for your career.
Finger-to-Key Mapping
| Finger | Home Key | Also Reaches |
|---|---|---|
| Left pinky | A |
Q, Z, 1, Tab, Caps Lock, Shift |
| Left ring | S |
W, X, 2 |
| Left middle | D |
E, C, 3 |
| Left index | F |
R, T, V, G, B, 4, 5 |
| Right index | J |
Y, U, H, N, M, 6, 7 |
| Right middle | K |
I, ,, 8 |
| Right ring | L |
O, ., 9 |
| Right pinky | ; |
P, /, 0, Enter, Shift, Backspace |
Click a home row key to select it, then click the correct finger zone to place it. One key per finger.
Pro Tip: When you are first learning, resist the urge to look at the keyboard. It will feel slow and frustrating at first, but looking at the screen (not your hands) is the single most important habit for developing touch typing speed.
Part 3: Posture and Ergonomic Setup
Good typing technique is not just about your fingers. Your entire body position affects your comfort, speed, and long-term health. Healthcare professionals who spend hours at a computer each day are at risk for repetitive strain injuries (RSIs) such as carpal tunnel syndrome, neck pain, and back problems. Setting up your workspace correctly from the start is one of the best things you can do for your career.
The Ergonomic Typing Checklist
Follow these guidelines every time you sit down at a computer. The Occupational Safety and Health Administration (OSHA) recommends the following posture for computer workstations:
- Feet flat on the floor or on a footrest. Your thighs should be roughly parallel to the floor.
- Elbows at a 90-degree angle (or slightly greater). Your forearms should be parallel to the floor or angled slightly downward.
- Wrists in a neutral position, not bent up or down. A wrist rest can help maintain this alignment when you are not actively typing, but do not rest your wrists while typing.
- Back supported by the chair. Sit upright or recline slightly. Use lumbar support if available.
- Monitor at arm's length, with the top of the screen at or slightly below eye level. This prevents you from tilting your head up or down.
- Shoulders relaxed, not hunched or raised. Keep your upper arms close to your body.
Click any numbered circle to see ergonomic guidance for that element.

Click two items to swap their positions, then check your answer.
Healthcare Scenario: Consider a medical billing specialist who spends six to eight hours a day entering claim data into a computer system. Without proper posture, this employee could develop chronic wrist pain, neck stiffness, or lower back problems within months. By following the ergonomic checklist above, they protect their health and maintain productivity throughout long shifts. Many healthcare employers provide ergonomic assessments for workstation setup. Take advantage of these resources.
Quick Posture Self-Check
Before you begin any typing practice session, run through this quick self-check:
- Are your feet flat on the floor?
- Are your elbows at approximately 90 degrees?
- Are your wrists straight and level with your forearms?
- Is the top of your monitor at eye level?
- Are your shoulders relaxed (not raised toward your ears)?
If you answer "no" to any of these questions, adjust your setup before you start typing. It takes only a moment to correct your position, and it makes a real difference over time.
Part 4: Building Your Practice Routine
Learning to type proficiently is similar to learning a musical instrument. You cannot become a skilled piano player by reading about piano. You have to practice. The same is true for keyboarding. Your fingers develop muscle memory through repeated, focused practice. Muscle memory is your brain's ability to perform physical movements automatically, without conscious thought, after enough repetition.
How Muscle Memory Works
When you first learn the home row, every keystroke requires deliberate effort. You think: "Where is the letter E? Left middle finger, reach up." Over days and weeks of practice, that conscious thought fades. Your middle finger simply moves to E when you need it, just as your hand reaches for a light switch in a familiar room without thinking about it. This is muscle memory at work.
Research shows that short, frequent practice sessions are more effective than long, occasional ones. Practicing for 15 to 20 minutes every day produces better results than practicing for two hours once a week.
Your Practice Plan
Throughout this course, you will use SAM (Skills Assessment Manager) from Cengage to build your typing speed and accuracy. SAM provides structured keyboarding lessons, timed practice exercises, and progress tracking — all integrated directly into your D2L Brightspace course.
Accessing SAM: Look for the SAM Keyboarding links in your D2L Brightspace course modules. Click the SAM activity link to launch the practice environment directly — no separate account or login needed.
Daily Practice Tips
- Start with the home row. Practice typing the home row keys (ASDF JKL;) until your fingers find them without looking. Then add key pairs: FJ, DK, SL, A;.
- Add one row at a time. Once you are comfortable with the home row, practice reaching to the top row (QWERTY) and then the bottom row (ZXCV).
- Focus on accuracy first. Speed will come naturally as your accuracy improves. If you are making more than three errors per minute, slow down.
- Time your sessions. Set a timer for 15 to 20 minutes. When the timer goes off, stop. Consistent, focused practice is more valuable than marathon sessions where your attention drifts.
- Track your progress. Record your WPM and accuracy after each session. You will be surprised how quickly the numbers improve.
Try It Now: Open your D2L Brightspace course and launch the SAM Keyboarding activity for this week. Complete the home row introductory lesson, then take a one-minute typing test to establish your baseline WPM. Write down your starting speed and accuracy. You will use this number to track your progress throughout the course.
Five-Minute Typing Test
Or practice right here. Take this five-minute test to establish your baseline. Type the healthcare passage below as accurately as you can. Focus on using the correct fingers on the correct keys rather than speed. Your results will be saved so you can track your progress throughout the course.
Test Complete!
What to Do with Your Score: Write down your WPM and accuracy percentage. This is your Week 1 baseline. You will take this same type of test each week to measure your improvement. Do not worry if the number seems low right now. Every expert typist started exactly where you are.
Knowledge Check
Knowledge Check
Lesson 1.1 Summary
- Keyboarding proficiency is a core healthcare skill. Administrative and clinical roles require accurate typing at 30 to 40 WPM or higher.
- The home row keys (ASDF JKL;) are the foundation of touch typing. The raised ridges on F and J help you find home position by feel.
- Proper ergonomic posture protects your health: feet flat, elbows at 90 degrees, wrists neutral, monitor at eye level, shoulders relaxed.
- Muscle memory develops through short, daily practice sessions of 15 to 20 minutes. Focus on accuracy first, and speed will follow.
- SAM (Skills Assessment Manager) from Cengage provides structured keyboarding practice, timed tests, and progress tracking directly within your D2L Brightspace course.